Kubernetes Jobs on GCP 25 Jan 2020
Disclaimer: these instructions were tested for ubuntu 16.04 and ubuntu 18.04. Specific commands might not generalize for different operating systems.
The Google Compute Platform (GCP) cloud provides powerful computational resources for big data analysis. This tutorial explains how to run a batch of compute jobs on the Google Compute Platform (GCP) cloud using kubernetes, docker, and gcsfuse.
For the purposes of this tutorial, we will perform the task of running the SPAdes genomic assembler on a number of genomic (fastq) source files.
Install the needed prerequisites:
Install gcloud and gsutil
curl https://sdk.cloud.google.com | bash
exec -l $SHELL
gcloud init
Authenticate with gcloud
gcloud auth login
You might need to configure your default gcp project. First check the configuration settings:
gcloud config list
If the proper project is not selected, you can change it:
gcloud config projects list
gcloud config set project "my-project"
install kube
It is recommended to install kube through gcloud if you will use it with GCP:
gcloud components install kubectl
A stand-alone installer is also available, but not recommended for GCP clusters: https://kubernetes.io/docs/tasks/tools/install-kubectl/
install gcsfuse for mounting gcp buckets
RUN apt-get update && apt-get install --yes --no-install-recommends \
    ca-certificates \
    curl \
    gnupg \
    && echo "deb http://packages.cloud.google.com/apt $GCSFUSE_REPO main" | tee /etc/apt/sources.list.d/gcsfuse.list \
    && curl https://packages.cloud.google.com/apt/doc/apt-key.gpg | apt-key add - \
    && apt-get update \
    && apt-get install gcsfuse -y \
    && apt-get clean && rm -rf /var/lib/apt/lists/* /tmp/* /var/tmp/*
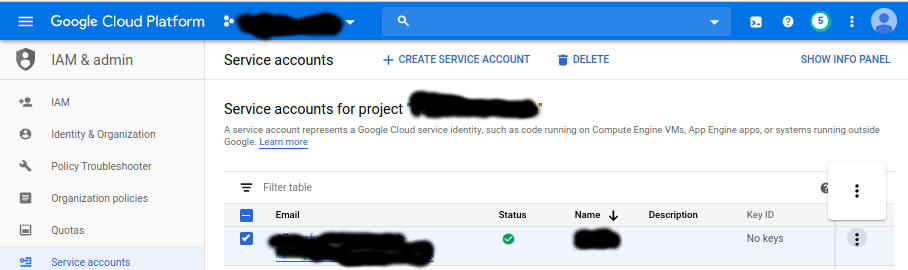
Create a service account for mounting the bucket: https://console.cloud.google.com/iam-admin/serviceaccounts?project=[add your project id here] (replace ‘gbsc-gcp-lab-kundaje’ with the relevant project id)
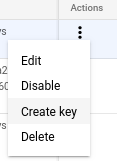
Create a service account, and download a key in json form.

install docker
sudo apt install docker.io
sudo systemctl start docker
sudo systemctl enable docker
Create your kubernetes cluster
You have now installed all of the tools we will use in this tutorial – on to kuberenetes-ing.
gcloud container clusters create \
       --machine-type n1-highmem-32 \
       --num-nodes 1 \
       --enable-autoscaling \
       --min-nodes=0 \
       --max-nodes=60 \
       --zone us-central1-b \
       --cluster-version latest \
       --disk-size=20Gi \
       spades
Let’s examine what each of these flags are:
- machine-type: determines the available cores and RAM. The available machine types are listed here: https://cloud.google.com/compute/docs/machine-types
- num-nodes: the initial number of nodes to create in our cluster (within the default node pool).
- enable-autoscaling: allows the cluster to grow and shrink in number of nodes based on compute demands
- min-nodes: the minimum number of nodes the cluster can reach when autoscaling is enabled (I like to set this to 0 to avoid wasting resources).
- max-nodes: the maximum number of compute nodes that can be created in the cluster.
- zone: geographic zone in which the cluster is create (generally this only matters for compatibilitly with other resources such as storage buckets)
- disk-size: the HDD size of each node in the cluster. Since we will be running our jobs inside docker images and mounting data from buckets, this value can be relatively small.
The name of the cluster we created is “spades”.
set your GCP account as an admin account on the cluster:
kubectl create clusterrolebinding cluster-admin-binding \
   --clusterrole=cluster-admin \
   --user=annashch@stanford.edu
Make sure kubectl is pointing to the cluster you just created:
gcloud container clusters get-credentials spades --zone us-central1-b
Create and populate GCP storage bucket
gsutil mb -l us-central1-b gs://keratinocytes/
This creates a bucket called “keratinocytes” in the compute zone “us-central1-b”. Make sure the zone name matches what you set in the cluster specification above.
Copy local files into your bucket:
gsutil cp -r [local_files_or_folder] gs://keratinocytes/
make sure the files were copied
gsutil ls gs://kerationcytes/
Verify that the bucket can be mounted locally with gcsfuse
First, obtain a json key file for mounting the bucket (see above)
mkdir /mnt/data
gcsfuse --key-file key.json --implicit-dirs  -o allow_other keratinocytes /mnt/data
ls /mnt/data
Note: it is not intuitive that the bucket name does not need to be prefixed by “gs://” when the mount command is executed. To unmount the bucket, run:
fusermount -u /mnt/data
Create an account on dockerhub
Refer to instructions here: https://hub.docker.com/signup Dockerhub accounts are free
Generate a dockerfile with your compute image
This is an example for our specific task. In this dockerfile we:
1) start with a base ubuntu bioinic image 2) Install the gcsfuse software for mounting gcp buckets. (We already did this on our local machine, the same series of commands can be added to the Dockerfile to install gcsfuse within the docker image). 3) copy the key.json file for mounting gcfuse buckets to the image 4) copy additional scripts for mounting the gs://keratinocytes bucket, unmounting the bucket, and running our script of interest (the SPAdes assembler in this case). 5) Install the spades assembler.
Dockerfile:
FROM ubuntu:bionic

ENV GCSFUSE_REPO=gcsfuse-bionic

RUN apt-get update && apt-get install --yes --no-install-recommends \
    ca-certificates \
    curl \
    gnupg \
    wget \
    python \
    python-dev \
    && echo "deb http://packages.cloud.google.com/apt $GCSFUSE_REPO main" | tee /etc/apt/sources.list.d/gcsfuse.list \
    && curl https://packages.cloud.google.com/apt/doc/apt-key.gpg | apt-key add - \
    && apt-get update \
    && apt-get install gcsfuse -y \
    && apt-get clean && rm -rf /var/lib/apt/lists/* /tmp/* /var/tmp/*
RUN mkdir /mnt/data


COPY key.json /etc/key.json
COPY mount.sh /opt/mount.sh
COPY umount.sh /opt/umount.sh


#install spades

WORKDIR /opt
RUN wget http://cab.spbu.ru/files/release3.14.0/SPAdes-3.14.0-Linux.tar.gz
RUN tar -xzvf SPAdes-3.14.0-Linux.tar.gz
ENV PATH="/opt/SPAdes-3.14.0-Linux/bin:${PATH}"
COPY script.sh /opt/script.sh

RUN chmod 777 /opt/*sh
CMD ["sleep", "360"]
In this Dockerfile, we copy “key.json”, “mount.sh”, “umoount.sh”, and “script.sh” to the docker image. The key file is the same as you obtained in step XX.
The contents of the other files are as follows:
mount.sh:
#!/bin/bash
gcsfuse --key-file /etc/key.json --implicit-dirs  -o allow_other keratinocytes /mnt/data
umount.sh:
#!/bin/bash
fusermount -u /mnt/data
script.sh:
#!/bin/bash
echo "running mount"
bash /opt/mount.sh
echo "mount successful"
echo "running spades"
spades.py --pe1-1 /mnt/data/$1.end1.trimmed.fastq.gz --pe1-2 /mnt/data/$1.end2.trimmed.fastq.gz -t 20 -o /mnt/data/SPAdes-3.14-$1
echo "ran ls"
bash /opt/umount.sh
echo "unmounting"
Now, build and push your image to dockerhub
cd <directory-where-Dockerfile-is-stored>
docker build -t spades_gcp .
Use the docker images command to view your newly created image:
docker images
The output will look similar to this:
REPOSITORY                                           TAG                             IMAGE ID            CREATED             SIZE
kundajelab/spades_gcp                                latest                          eb64bbfe1edb        16 hours ago        288MB
Tag your docker image and push it to dockerhub
docker tag eb64bbfe1edb kundajelab/spades_gcp:eb64bbfe1edb
The syntax above indicates that image with id eb64bbfe1edb will be pushed to the kundajelab dockerhub organization (you can use your own user account in place of kundajelab), to a repository called spades_gcp, with unique tag eb64bbfe1edb. The tag can be whatever you wish, a common practice is to use the word “latest” – but my preference is to have each remote tag be a unique identifier.
Now, login to dockerhub and push your built image:
docker login
You will be prompted to provide the username and password you created for dockerhub above.
docker push kundajelab/spades_gcp:eb64bbfe1edb
Create kubernetes yaml files to submit your job – If you only need to run a handful of jobs
spades_job.yaml:
apiVersion: batch/v1
kind: Job
metadata:
  name: spades1
spec:
  ttlSecondsAfterFinished: 30
  template:
    spec:
      containers:
      - name: spades
        image: kundajelab/spades_gcp:latest
        resources:
          requests:
            memory: 50Gi
            cpu: 15
          limits:
            memory: 100Gi
            cpu: 15
        securityContext:
          privileged: true
          capabilities:
            add:
              - SYS_ADMIN
        command: ["/opt/script.sh"]
        args: ["keratinocytes-0.5d-rep1"]
      restartPolicy: OnFailure
  backoffLimit: 1
Let’s break down what we have specified in the yaml file:
- metadata.name – the name of the job (spades1)
- spec (outer) is the specification of the Job:
- ttlSecondsAfterFinished – cleans up resources for finished jobs within 30 seconds after they are complete
- template – template for the Pod that will execute the Job
- backOfLimit – number of times to try running the Job before giving up
- Pod template:
- spec (inner) is the specification of the Pod
- restartPolicy – the Pod will be restarted if it fails (and the backOfLimit is not yet exceeded)
- spec (inner) is the specification of hte Pod:
- container – this is a virtual image for running the job
- image – this is the docker image we pushed to dockerhub (make sure this image is set to Public on Dockerhub)
- resources – requested and maximum CPUs and RAM resources for the job
- securityContext – run the job with admin privileges in the docker container (this is needed for mounting buckets with gcsfuse)
- command – command to execute in the Job
- args – arguments passed to the command
- container – this is a virtual image for running the job
Submit the job as follows:
kubectl apply -f spades_job.yaml
monitor job execution
kubectl get all
gives:
NAME               READY   STATUS    RESTARTS   AGE
pod/spades-hsrx5   1/1     Running   0          14h

NAME                 TYPE        CLUSTER-IP    EXTERNAL-IP   PORT(S)   AGE
service/kubernetes   ClusterIP   10.35.240.1   <none>        443/TCP   15h

NAME               COMPLETIONS   DURATION   AGE
job.batch/spades   0/1           14h        14h
Use the “describe” command to check the status of a job or pod.
kubectl describe job.batch/spades
tells us the job is running:
Name:           spades
Namespace:      default
Selector:       controller-uid=059cc91e-0e02-4ecd-89aa-3d347c55579e
Labels:         controller-uid=059cc91e-0e02-4ecd-89aa-3d347c55579e
                job-name=spades
Annotations:    kubectl.kubernetes.io/last-applied-configuration:
                  {"apiVersion":"batch/v1","kind":"Job","metadata":{"annotations":{},"name":"spades","namespace":"default"},"spec":{"backoffLimit":1,"templa...
Parallelism:    1
Completions:    1
Start Time:     Sat, 25 Jan 2020 03:16:44 -0800
Pods Statuses:  1 Running / 0 Succeeded / 0 Failed
...
And same for a pod:
kubectl describe pod/spades-hsrx5
Name:           spades-hsrx5
Namespace:      default
Priority:       0
Node:           gke-spades-default-pool-eeea0ebb-3144/10.128.0.42
Start Time:     Sat, 25 Jan 2020 03:16:44 -0800
Labels:         controller-uid=059cc91e-0e02-4ecd-89aa-3d347c55579e
                job-name=spades
Annotations:    kubernetes.io/limit-ranger: LimitRanger plugin set: cpu request for container spades
Status:         Running
...
Use the “logs” command to view a pod’s logs.
kubectl logs pod/spades-hsrx5
running mount
Using mount point: /mnt/data
Opening GCS connection...
Opening bucket...
Mounting file system...
File system has been successfully mounted.
mount successful
running spades
...
Submitting a large number of jobs
This gets tricky… GCP and AWS functionality is largely analogus with the exception of batch job submission, as documented in this service comparison released by GCP in November 2018
Some tools that may help achieve the desired SLURM-like functionality we have come to know and love are:
These are useful tools for production-quality kubernetes clusters and worth learning – but the learning curve can be a bit steep. (Comment below if you’ve had success running GCP batch jobs with these tools).
If you’re a grad student trying to process some data or train some machine learning models as painlessly as possible, a “hack” is as follows:
1) Create a template yaml file with placeholders for the job name and the script arguments, as follows:
spades_job.template.yaml:
apiVersion: batch/v1
kind: Job
metadata:
  name: NAME
spec:
  ttlSecondsAfterFinished: 30
  template:
    spec:
      containers:
      - name: spades
        image: kundajelab/spades_gcp:latest
        resources:
          requests:
            memory: 50Gi
            cpu: 15
          limits:
            memory: 100Gi
            cpu: 15
        securityContext:
          privileged: true
          capabilities:
            add:
              - SYS_ADMIN
        command: ["/opt/script.sh"]
        args: ["ARGS"]
      restartPolicy: OnFailure
  backoffLimit: 1
Notice that this script is the same as “spades_job.yaml” above, with the exceptions that “NAME” and “ARGS” have been used to replace the actual job name and arguments.
We can write a batch job that iterates through all samples to be processed and uses the “sed” command to replace these placeholders with actual job and samle names:
make_job_yamls.sh
#!/bin/bash
num_tasks=`cat tasks | wc -l`
echo $num_tasks
for i in `seq 1 $num_tasks`
do
    sample=`head -n $i tasks | tail -n1`
    task_name=spades$i
    echo $sample
    echo $task_name
    sed "s/NAME/$task_name/g" spades_job.template.yaml > tmp
    sed "s/ARGS/$sample/g" tmp > job_$task_name.yaml
    rm tmp
done
Where the tasks file is a list of sample names to analyze:
head tasks
keratinocytes-0.5d-rep1
keratinocytes-0.5d-rep2
keratinocytes-0h-rep1
keratinocytes-0h-rep2
This will produce a yaml file for each job with a unique job name.